Sign in

ArduCopter (ArduPilot) tuning practice

Learn drone PID tuning (ArduCopter) in your browser,
before you crash one

TuneKata runs the real ArduCopter flight-controller firmware inside your browser and walks you through the ArduPilot wiki’s tuning process step by step, plus Loiter: hover, filters, QuikTune, AutoTune, Loiter. Each step checks itself, so you can master the procedure before you touch a real aircraft.

7-day trial with all eight steps; steps 1 and 2 stay free afterwards. Sign in with an email code; nothing to install.
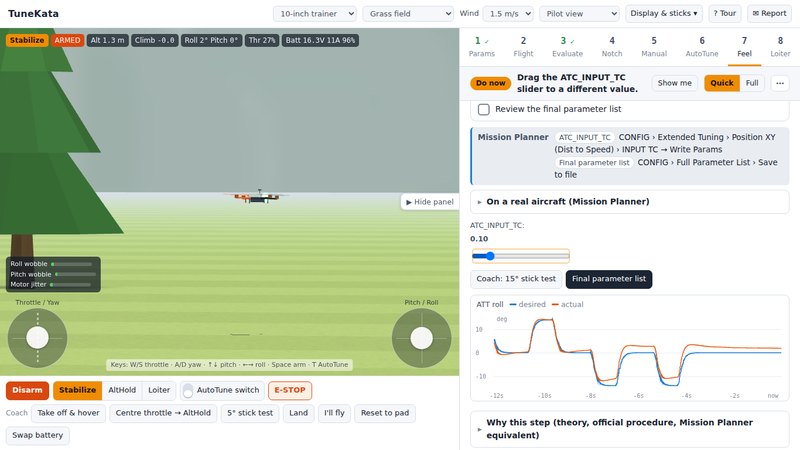
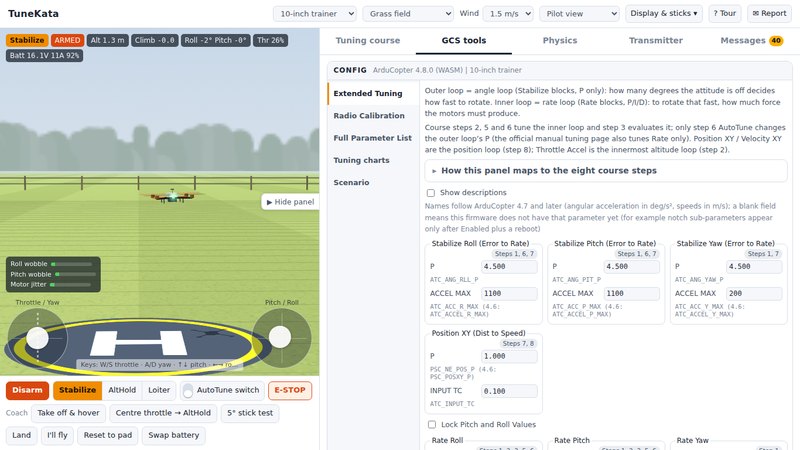
TuneKata: a 10-inch trainer hovering in the 3D flight field, with step 7 of the tuning course on the right
8stepsThe official tuning process plus Loiter; every step checks itself
1,400+Flight-controller parameters, exactly as Mission Planner shows them
~4MBFirmware downloaded on your first visit
0installsRuns in the browser; sign in with an email code

Two minutes

Watch two minutes before you decide

Boot, first flight, AutoTune: all eight steps at a glance.

Hosted on YouTube; it loads only when you press play (youtube-nocookie.com).

Why

Why it is different

01

The real firmware, not an imitation

What runs on screen is the ArduCopter firmware itself: 1,400+ parameters, PreArm messages, AutoTune progress and DataFlash logs, all exactly as Mission Planner shows them. The names, screens and procedures you learn here are the same on a real aircraft. The numbers tuned on the simulated aircraft belong to the simulation and must not be used on a real one.

ArduPilotThe ArduPilot logo is used with the permission of the ArduPilot development team. This site is not affiliated with or endorsed by the ArduPilot project.

02

The official process, plus Loiter

A course laid out after the ArduPilot tuning documentation. Every step has tasks with checks: did the hover throttle get learned, did the notch filter remove the vibration, were the AutoTune gains saved. Done right, they tick themselves.

03

Your transmitter, different airframes

Plug in your own transmitter over USB; switches and sticks follow the ArduPilot rules. After the 10-inch trainer, move to a 22-inch heavy quad, or generate a random airframe with different weight, motors and props and tune it again.

The course

The eight-step drone PID tuning course

In the order of the ArduPilot tuning documentation, with Loiter added as the last step. Every step has tasks with checks, and ticks itself when done right.

STEP 01Set up parametersStarting values for filters, thrust curve and battery from prop size and cell count
STEP 02First flight and hover learningA safe first take-off, letting the FC learn the hover throttle
STEP 03Stick evaluation5° stick tests to judge oscillation and sluggishness
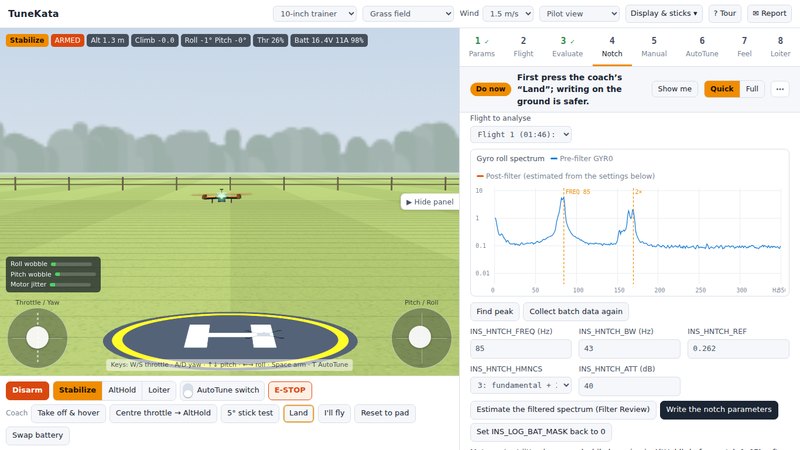
STEP 04Notch filtersFFT of IMU batch samples, find the prop vibration frequency, set the harmonic notch
STEP 05Manual tuning / QuikTuneThe official Lua script finds the P and D limits automatically
STEP 06AutoTuneThe real AutoTune procedure: switch, progress, saving the gains
STEP 07FeelInput shaping time constant, tuned to the response you like
STEP 08Loiter and position controlHold error and braking distance after stick release

Inside the app

What it looks like

Step 4 notch filters: FFT spectrum of IMU batch samples with the propeller vibration peak and notch centre marked
FIG. 01Step 4: run an FFT on the batch samples, find the propeller vibration peak, write the notch and measure again.
GCS tools: the Extended Tuning page, with the same parameter layout as Mission Planner
FIG. 02GCS tools: Extended Tuning, Radio Calibration, the full parameter list and tuning charts, laid out the way Mission Planner does it.

Before you start

Requirements

BrowserLatest Chrome or Edge (desktop). Safari and Firefox are not supported yet; Chrome on macOS and Linux is not something we test regularly, so check it during the trial first.
ComputerMinimum: Windows 10 (64-bit) or 11, a 4-core CPU (Core i5 / Ryzen 3 from 2018 or later), 8 GB of RAM, integrated graphics (Intel UHD 620 or better) with hardware acceleration enabled in the browser, 1366×768. Recommended: Core i5 / Ryzen 5 from 2020 or later, 16 GB, a discrete graphics card (GTX 1050 or better), 1920×1080. The first visit downloads about 4 MB of firmware.
Not supportedPhones and tablets. A transmitter is optional: any radio with a USB joystick mode, or a gamepad.

Mission

Why TuneKata exists

Our goal is simple: everyone in the world who wants to learn tuning should be able to practise until they can do it, before they touch a real aircraft.

Almost everyone learns PID tuning by crashing. The official documentation is thorough, but it is hard to picture from text alone how an aircraft will respond, and real aircraft are expensive: one wrong number can mean a repair.

I am a UAV R&D engineer, and I learned it the same way, one crash at a time. So I built this place: the real flight-controller firmware running in your browser, where you can walk through the whole official tuning process, and when you get it wrong you press a button and start again.

Multirotor only for now. A fixed-wing / VTOL edition is under consideration: if you want one, email support@tunekata.com with the subject “Fixed-wing edition”, and we will build it if enough people ask.

US$ 14.99 a month, or US$ 119 a year

Charged in your local currency at checkout (in Taiwan NT$ 480 / NT$ 3,790). New accounts get a 7-day free trial with all eight steps; afterwards steps 1 and 2 stay free. Payments are handled by Paddle and you can cancel any time. Team seats for schools and companies are quoted separately.

Plans and pricing→